Slicer Open-LIFU (Advanced Users)
For day-to-day clinical-style planning, the Open-LIFU Desktop Application provides the safest path. Slicer Open-LIFU is the same set of modules exposed directly inside vanilla 3D Slicer, with fewer guardrails — intended for advanced research workflows.
Reduced guardrails outside the Desktop App
Only advanced users should use the Slicer modules directly. Fewer safety and permission restrictions apply to system configuration and operation than in the Desktop Application. Because the underlying data objects are more explicitly exposed and mutable, it is possible to configure the system to operate outside of bounds for system safety, integrity, and performance.
Running Slicer Open-LIFU does not restrict or prevent accidental sonications. A sonication solution can still be sent to the transducer even if the parameters fall outside safe or acceptable zones. Users are responsible for understanding the sonication protocol parameters and the effects they may have on the subject.
Install Slicer with the Open-LIFU extension
To access the full set of advanced tools, install vanilla Slicer and the Open-LIFU extension directly. This allows the use of external Slicer functions to modify the volumes, meshes, and transformations used during sonication planning.
Download Slicer
- Download the latest stable release of Slicer from download.slicer.org.
- On Windows: during installation, ensure that there are no spaces
in the installation path. (
C:\Users\Username\AppData\Local\slicer.org\3D Slicer 5.10.0will fail;C:\Users\Username\AppData\Local\slicer.org\3DSlicer5.10.0is fine.)
Install the SlicerOpenLIFU extension
The SlicerOpenLIFU extension is in the Slicer Extensions Manager.
- Launch Slicer.
- Navigate to View in the top-left corner.
- Click Manage Extensions.
- Type "Open-LIFU" in the search bar. Locate the Open-LIFU extension and click Install.
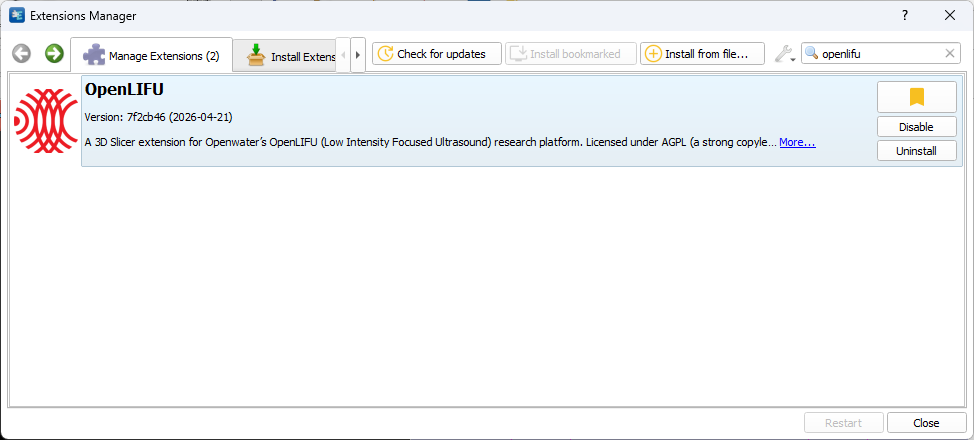
- Once installation completes, restart the application for the extension to be enabled.
- If you need an older version, go to the
SlicerOpenLIFUrepository and follow the manual install instructions. You must uninstall any previous version of the Open-LIFU extension and restart Slicer before installing a new one.
To perform offline mesh reconstruction instead of using the Openwater
cloud reconstruction service, you also need to install Meshroom and
add it to your system PATH. See the
openlifu-python README
for details.
Slicer modules at a glance
The Slicer Open-LIFU extension exposes additional functionality for each module that is otherwise disabled in the Desktop application.
| Module | Description |
|---|---|
| Data Management | Set up and configure database directories for accessing user and subject data used during a session. |
| Sonication Protocol | Create custom sonication protocols using the Protocol Configuration Wizard. |
| Pre-Planning | Place targets within a body region (e.g., the brain) and suggest transducer placement options to ensure the target lies within the focused beam pathway. |
| Transducer Localization | Use photogrammetry to map the virtual transducer to the physical transducer by co-registering an MRI with a photoscan. |
| Sonication Planning | Compute the sonication solution from all sonication inputs and visualize the activation volume to ensure the target lands within the focal spot. |
| Sonication | Monitor the progress and delivery of the full treatment to the prescribed target, usually consisting of multiple sonications. |
Workflow modes
The Slicer modules support two workflow modes:
- Prescribed Workflow (Session) — load a predefined session containing specific Sonication Protocols, Transducers, Volumes, and Targets. These parameters are locked throughout the workflow to ensure consistency and to guide the user through a prescribed path.
- Open Workflow (No Session) — input and modify data independently within each module. Ideal for testing specific features, custom workflows, or iterative functionality where parameters need to change between stages.
Data Management
The Open-LIFU Data page introduces a section to view the data objects associated with a session. The user may define (create) a session by selecting a subject, sonication protocol, transducer, MRI volume, fiducial landmarks, and photoscan. These all then get saved to the session.
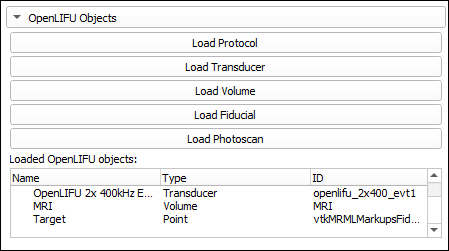
When working without a session, you can load each object independently using the buttons in the OpenLIFU Objects panel. When working with a session, the loaded objects are pre-populated from the session definition and reflected in the loaded-objects table.
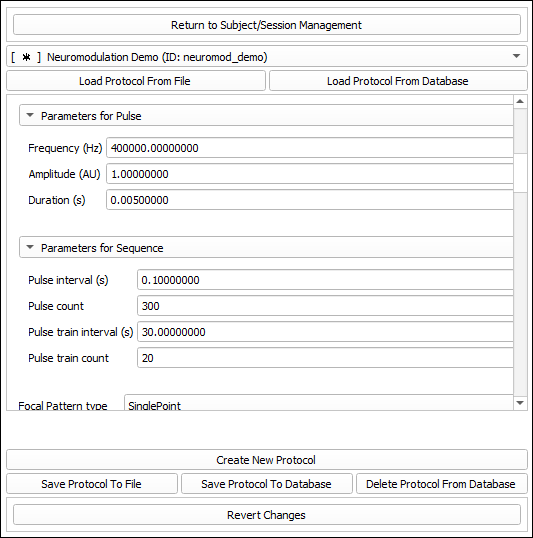
Sonication Protocol
The Sonication Protocol module is where users define the pulse and sequence parameters that govern a sonication. The editor matches the functionality in the Desktop application.
Pre-planning
The Pre-planning module is the interface for placing targets and identifying appropriate transducer placement and orientation options based on the selected target location. When the user is not proceeding with a session, the input objects to the Virtual Fitting algorithm may be selected from any objects imported during the previous Open-LIFU Data step. Volumes can point to any volume imported into Slicer (DICOM, NRRD, processed volumes, etc.). Targets can be imported as any markup point file type. The Protocol and Transducer files are Open-LIFU-specific and must be loaded from files provided to the user.
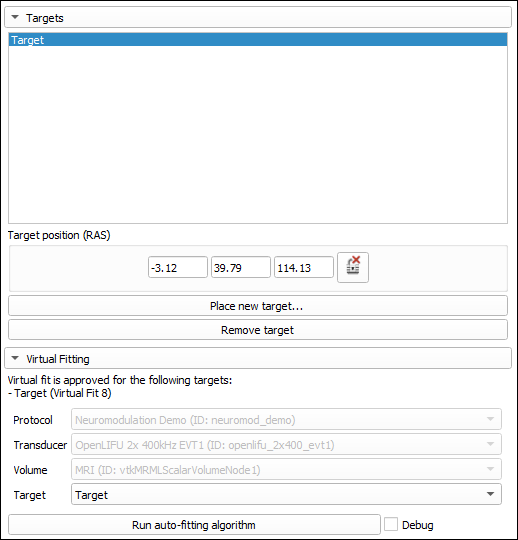
Multiple targets can be placed and locked. The desired target can then be selected for determining the initial transducer placement.
Transducer Localization
The Transducer Localization module is the main interface for
co-registering a photogrammetry scan to a segmented volume (e.g., an MRI).
The user can complete this through online or offline reconstruction, or
manually upload a photocollection or pre-reconstructed photogrammetry
scan from local disk via the Browse button. Manually uploaded
photogrammetry scans must be in .obj format.
Continuing with a session
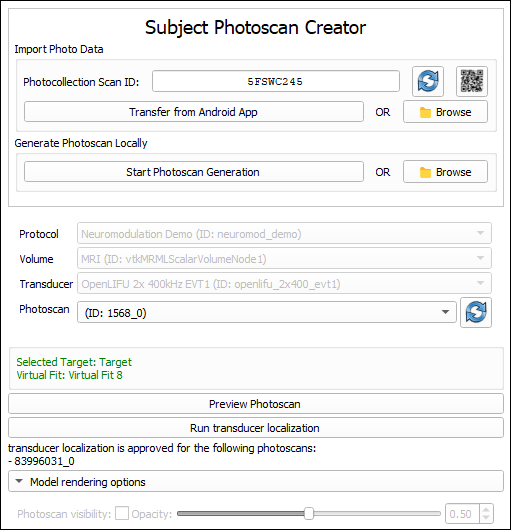
Click the QR code and scan it using the photogrammetry phone app to streamline entering the data into the phone app.
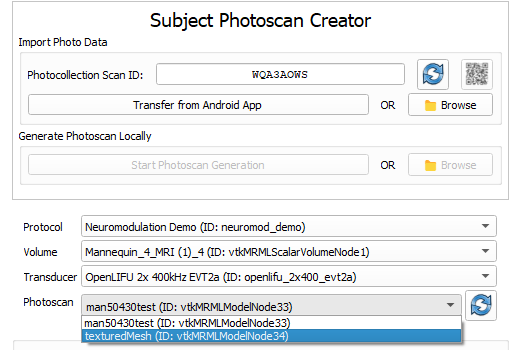
Continuing without a session
If the user has decided to continue without selecting a session and has manually uploaded multiple data objects in the Open-LIFU Data section, the user is able to select from those objects in this section. The user can instantly alternate between various imported data objects and test the transducer localization accordingly.
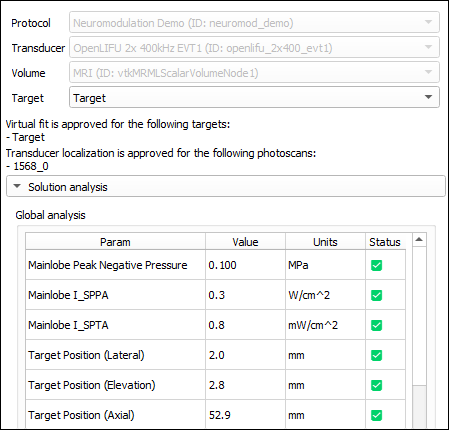
Sonication Planning
The Sonication Planning module has fields to choose loaded Protocols, Transducers, Volumes, and Photoscans for beamforming and simulation.
- With a session. The data objects associated with the session are pre-selected and greyed out in the data sections. Once selected, users may proceed with computing the sonication solution per the session's data objects.
- Without a session. Users may select from previously uploaded data objects. This allows alternation between data objects to instantly test the sonication solution against various volumes and photoscans.
Sonication
When the device is powered on and fully connected to the headset, the connection status is indicated in the user interface.
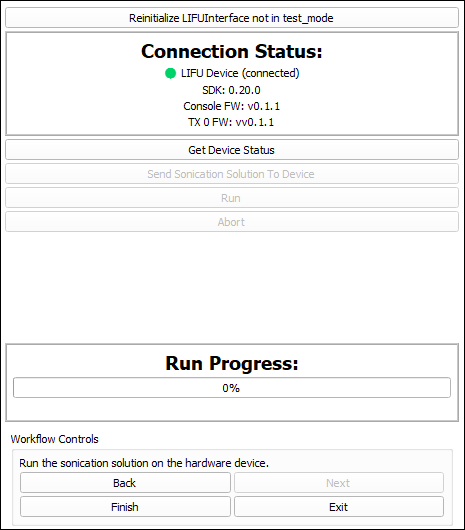
A progress bar tracks completion once the solution is sent to the device.
Solution analysis warnings vs. enforcement
The Sonication module issues a warning for solutions that fail analysis checks but does not always prevent execution. Proceeding with these solutions poses a significant risk of hardware damage or subject injury and should not be attempted.
Note: if voltage or duty cycle values fall outside predefined thresholds, the software will produce an error and the sonication solution will not be sent to the device.
Where the safer path lives
If you are not specifically running advanced research workflows that require the additional Slicer-module exposure, use the Open-LIFU Desktop Application instead. The Desktop App enforces user permissions, locks down workflow constraints, and prevents many of the misconfigurations possible in the Slicer-direct path.